วันอังคารที่ 27 สิงหาคม พ.ศ. 2556

Google Dream Office สำนักงานในฝัน

Google Dream Office สำนักงานในฝัน

                             Teacher :  Phaitoon  Yaemprasuan 
                                                       http://picta55.blogspot.com

         SOURCE:  http:// www.bigpicture.ru

Google has been founded in California in January 1996 as a research project by Larry Page and Sergey Brin when they were both studying in graduate school at Stanford University. 15 years later, Google is one of the most recognizable brands in the world. The company manages more than one million servers in data centers (DC) around the world, and processes over one billion search requests and twenty-four petabytes of user data each day, bringing incredible profits to its owners. Part of this income is invested in creating the most comfortable and pleasant working environment, which each employee can only dream of.

Google ก่อตั้งขึ้นที่มลรัฐแคลิฟอร์เนีย สหรัฐอเมริกา ในปี 1996 ในลักษณะ research project (โครงงานวิจัย)  โดย Larry Page และ Sergey Brin สองหนุ่มนักศึกษา บัณฑิตวิทยาลัย (graduate school - จะเป็นเสมือนคณะในมหาวิทยาลัย ที่ทำหน้าที่ประสานงานการจัดการศึกษาในระดับที่สูงกว่าปริญญาตรี) มหาวิทยาลัยสแตนฟอร์ด (Stanford University - มหาวิทยาลัยชั้นนำแห่งหนึ่ง ของสหรัฐอเมริกา)  15 ปี หลังจากนั้น Google ได้กลายเป็นแบรนด์สินค้าที่ได้รับการยอมรับในระดับโลก  โดยที่ Google ต้องบริหารจัดการเครื่องคอมพิวเตอร์แม่ข่าย (servers) จำนวนมากกว่าหนึ่งล้านเครื่อง ที่อยู่ตามศูนย์เก็บข้อมูล [data centers (DC)] ซึ่งกระจายตัวอยู่ทั่วโลก  และต้องทำการประมวลผล search requests (คำร้องขอให้สืบค้นข้อมูล) มากกว่าหนึ่งพันล้านคำขอ  ซึ่งปริมาณข้อมูลในแต่ละวันมีมากถึง 24 petabytes (24 ล้าน-ล้าน กิกะไบต์)  ก็คิดเอานะว่า ปีหนึ่งๆ Google จะโกยรายได้ไปเท่าไรจากผู้ใช้งานทั่วโลก (แม้ว่าคนธรรมดาอย่างเราๆ จะใช้ฟรี  แต่อย่าลืมว่า ผู้ใช้รายใหญ่ที่เป็นหน่วยงาน หรือองค์กร ที่เขาใช้ข้อมูลเยอะๆ ข้อมูลขนาดใหญ่ๆ เพื่อความปลอดภัย รวดเร็ว ... เขาก็ต้องเสียเงินค่าเช่านะ  แล้ว Google ยังได้ค่าโฆษณาอีกล่ะ มากมายมหาศาล) ก็เพราะรายได้มากมายนี่เอง Google เขาก็ต้องเอาใจพนักงานของเขา ที่เป็นมันสมอง เป็นมือ เป็นไม้ ให้ Google ดำเนินไปได้  (คนที่ Google จ้างมาทำงานนี่ ต้องมีความรู้ ความสามารถอยู่ในขั้นเทพ... กว่าจะผ่านการคัดกรองไปเป็นพนักงงานของเขาได้ ก็คงไม่ใช่ธรรมดาสามัญแน่) จึงพยายามสร้างที่ทำงานในฝัน ให้กับพนักงานของเขา  เป็นทำนองซื้อใจพนักงานให้มีขวัญกำลังใจเต็มร้อย ลุยงานโลดๆ โดดเด่นไม่เห็นฝุ่น ประมาณนั้น 


google01 Офис мечты: Работа в компании Google
1. Surfboards at the wall in the office of «Google» in Santa Monica, California October 11, 2010. Google Inc. - An American multinational public corporation that invests in Internet search, cloud computing, and advertising technologies.
ขนาดกระดานโต้คลื่น  ยังแสดงให้เห็นว่า บริษัทยักษ์ใหญ่ข้ามชาตินี้ ทำการใหญ่ขนาดไหน  แค่เป็นเจ้าพ่อการสืบค้นผ่านอินเทอร์เน็ต ระบบคลาวด์คอมพิวติ้ง และเป็นขาใหญ่ด้านเทคโนโลยีการโฆษณา  สามอย่างนี้ Google ก็รวยซะจนไม่รู้จะรวยยังไง

 
google02 Офис мечты: Работа в компании Google
2. Employees during a lunch break at a rest in the sun's headquarters in Mountain View, Calif., March 3, 2008.Google headquarters is called the "Googleplex" and is located in the famous "Silicon Valley." 
Googleplex แหล่งรับประทานอาหาร และพักผ่อน
google03 Офис мечты: Работа в компании Google
3. March 3, 2008 employees purchased food in one of the fifteen cafes located in the company's headquarters in Mountain View, California. Meals for employees of the company - free.
 พนักงานกินฟรีครับ
 
google04 Офис мечты: Работа в компании Google
Of 4. Employees in the "game room" where they can spend their time playing ping-pong or snooker, or doing at the gym. In 2011, Google has been recognized as the company with the best reputation in the U.S., ahead of Microsoft, Sony and other companies
 สนับสนุนส่งเสริมให้เล่น และพักผ่อนเต็มที่ เกินหน้าเกินตายักษ์ใหญ่ไมโครซอฟต์ โซนี่ และบริษัทแถวหน้าทั้งหลายไปแล้วเน้อ
 
google05 Офис мечты: Работа в компании Google
5. DenaKaufer, owner of the salon «Onsite Haircuts», cuts employee «Google Inc» at the company's headquarters May 10, 2007. Service «Onsite Haircuts» is held right in the workplace and demonstrates the unique culture of Silicon Valley, and therefore most welcome by the owners of local companies as they seek to motivate workers and give them some sense of community. Ultimately, experts say, such a working environment increases productivity.
มีบริการตัดผม ให้แก่พนักงานซะด้วยเน้อ 
 
google06 Офис мечты: Работа в компании Google
6. At the headquarters of the company «Google» in Mountain View, California, employees are free to use the gym.Picture taken March 3, 2008.
 มีสถานที่ให้พนักงานมาออกกำลังกายอีกด้วย ... สุดยอดจริงๆ
 
google07 Офис мечты: Работа в компании Google
7. Swimming pool, beside which constantly lifeguard. Picture taken March 3, 2008 at the company's headquarters - "Googleplex". The name is a contamination of the words Google - the name of the company - and the complex (with Engl. Group of buildings), and the name refers to the number googolplex, equal to ten degrees googol (that is equal to 1010100).
 สระว่ายน้ำก็ยังมี
 
google08 Офис мечты: Работа в компании Google
8. An employee with his dog in his office March 3, 2008. The picture was taken at the company's headquarters.The first four buildings in the complex "Googleplex" were originally built for the company Silicon Graphics in 1997, in 2003, Google took them out, and in 2006 bought the property with another Silicon Graphics (total value of the transaction amounted to 319 million dollars).
 นำสัตว์เลี้ยงมาทำงานด้วยยังได้อีก
 
google09 Офис мечты: Работа в компании Google
9. An employee of the company «Google» asleep in a special "capsule", blocking light and sound. The picture was taken at the headquarters of March 3, 2008.
 มีแค็ปซูล เอาไว้ให้พนักงานไปงีบสักพักหนึ่ง หายง่วงแล้วก็มาทำงานเต็มที่
 
google10 Офис мечты: Работа в компании Google
10. Employees of the company «Google» during a break in the New York office of «Google» March 10, 2008.
 เวลาเบรกของเขาล่ะ
 
google11 Офис мечты: Работа в компании Google
11. Employees called each other "Googlers." In the photo - an office in New York City during a break March 10, 2008.
 พนักงานจะเรียกแต่ละคนว่า Googlers (สาวกกูเกิล)
 
google12 Офис мечты: Работа в компании Google
12. Games room in the office of «Google» in New York March 10, 2008. Google maintains and develops a number of Internet-based services and products, and a profit primarily from advertising through its program of AdWords.
 ห้องเกม
 
google13 Офис мечты: Работа в компании Google
13. An employee of the company «Google» with the designer "Lego" in the New York office of March 10, 2008.
พนักงานกูเกิล ที่เป็นนักต่อชิ้นส่วน Lego ก็ยังมี
 
google14 Офис мечты: Работа в компании Google
14. An employee rides a scooter through the corridors of the New York office of the company «Google» March 10, 2008.
 ต้องใช้สกู๊ตเตอร์
 
google15 Офис мечты: Работа в компании Google
15. The staff at the New York office of the company «Google», March 10, 2008. The stated mission of the company from the beginning was "organizing the world's information, making it available and the benefits for all" and the company's unofficial slogan coined by Google engineer Paul Buchheit, "Do not be evil" (English Don't be evil)
 สโลแกนของ Google : "บริหารจัดการสารสนเทศของโลก ให้ยังประโยชน์กับชาวโลกทั้งมวล" 

google16 Офис мечты: Работа в компании Google
An employee who is the Lego designer.
พนักงานคนนี้แหละ นักออกแบบการต่อชิ้นส่วนเลโก้


google17 Офис мечты: Работа в компании Google 
 An employee uses her laptop PC. 
พนักงานหญิงของกูเกิ้ลใช้คอมพิวเตอร์วางตักของเธอในสำนักงาน 

วันเสาร์ที่ 10 สิงหาคม พ.ศ. 2556

10 projects on the future of Google Google X สุดยอดโครงการในอนาคตของกูเกิล

As you know, Google - is not only a search engine: The company is a world leader in the creation of gadgets, internet services, and more. The most curious development team is engaged in a secret Google X, and among their projects -  here are 10 ideas that the Internet giant seeks to bring to life. 
ก็อย่างที่เราทราบกันดีว่า Google ไม่ใช่เพียงแค่ Search Engine (เว็บไซต์ให้บริการสืบค้นข้อมูล)  แต่เป็นบริษัทยักษ์ใหญ่ที่สร้างสรรค์ Gadgets (อุปกรณ์อิเล็กทรอนิกส์ขนาดเล็ก)  การให้บริการต่างๆ ผ่านเครือข่ายอินเทอร์เน็ต ฯลฯ   แต่ตอนนี้ทีมงานพัฒนาสุดเทพ (the most curious development team) ของพวกเขา  กำลังซุ่มทำโครงการลับ Google X (x คือ 10 ตามเลขโรมันนั่นแหละ)


googlefuture01 10 проектов будущего от Google
1. Car without a driver will make road traffic safer
Experts of Google X for several years working on the project Driverless Car Program. 
Negotiations are underway with the authorities for permission to test the self-governing vehicles on public roads - as long as this agreement only states of California and Nevada. 
A fleet of ten vehicles with test systems allow run over more than 480 thousand km (as of August of 2012), and of course, tests are continuing. However, it is unclear when such a system will be commercially available. 

โครงการขั้นเทพแรกสุดของเจ้าพ่ออินเทอร์เน็ตรายนี้ก็คือ รถยนต์ไร้คนขับ   กูเกิลต้องไปเจรจาขออนุญาตจากทางการ
 (negotiations are underway with the authorities for permission) ที่จะทดสอบรถยนต์ที่มันควบคุมตัวมันเองได้  (to test the self-governing vehicles)  บนถนนหลวง (on public roads)  ของสองมลรัฐเท่านั้น คือ มลรัฐแคลิฟอร์เนีย (แค่รัฐนี้ก็มีพื้นที่ใหญ่กว่าประเทศไทยแล้ว)  กับมลรัฐเนวาดา  (ก็อย่างว่าแหละ ถนนในสองมลรัฐนี้มันวิ่งผ่านทะเลทรายซะเป็นส่วนใหญ่ การจราจรบนถนนมันจึงเบาบาง จึงเหมาะกับการทดสอบรถยนต์อัจฉริยะของกูเกิลเขาล่ะนะ)   ตอนนี้พวกหมู่เขาชาวกูเกิลก็เลือกเอารถยนต์รักษ์โลก Toyota Prius สุดยอดรถยนต์ลูกผสม (Hybrid) อันโด่งดังของค่ายรถยนต์ยักษ์ใหญ่ของโลก (ขณะนี้ Toyota เป็นกลุ่มยานยนต์ที่มียอดการขายรวมสูงสุดเป็นอันดับ 1 ของโลกไปแล้ว  จากรถยนต์ในกลุ่มหลายแบรนด์ คือ Toyota, Hino, Dihatsu, Lexus)  มาทำการทดสอบระบบนี้อยู่  มีรถยนต์ที่ทดสอบระบบนี้นับสิบคัน  ต้องวิ่งยาวๆ เกือบ 5 แสนกิโลเมตร  เลยทีเดียว


googlefuture02 10 проектов будущего от Google
2. Google Glass will change the way you think about gadgets
Having put on those glasses, you can forget about the screens of smartphones and computers - the right information will always be available in only one eye movements. 
One way to look up - and before you calendar, email, social networks, weather, in general, everything that you want. 
Google Glass makes a revolutionary technology available to a wide range of people so far only a few lucky people, mostly developers and journalists were able to get a working prototype of points, but the consumers opportunity arises next year. 

แว่นตาวิเศษของกูเกิล
  คือถ้าลองได้สวมแว่นตาสุดเทพนี้ละก็  เห็นท่าว่าเราคงจะลืมหน้าจอของสมาร์ตโฟน (ที่เราว่าเจ๋งแล้วนา) และหน้าจอคอมพิวเตอร์สุดโปรดของเราไปเลย  คือ ข้อมูลข่าวสารทั้งหลายที่เราอยากจะรู้  อาทิ วันเวลา  อีเมล์  สภาพอากาศ  แม้แต่สื่อสังคอมออนไลน์ (อาทิ facebook)  มันจะเผยโฉมให้เราเห็นได้ เพียงแค่เรากระดิกพลิกตาเราเท่านั้นแหละ (หวังว่ากูเกิ้ลคงไม่ได้โม้นะ) 


googlefuture03 10 проектов будущего от Google
3. "Smart House" according to Google
The technology, called Android @ Home, will fully automate all of the life support system by connecting to the Internet, for example, while you are not home, a refrigerator will be able to order the necessary products itself, and coffee maker to make coffee exactly to your arrival. 
Android @ Home will connect all electrical appliances.

บ้านอัจฉริยะ
 
 ในแนวคิดของกูเกิ้ล  เทคโนโลยีนี้เรียกว่า  
Android @ Home  ซึ่งจะเนรมิตให้บ้านกลายเป็นบ้านอัตโนมัติ ด้วยการเชื่อมต่อกับอินเทอร์เน็ต  ยกตัวอย่าง  ขณะที่เราไม่อยู่บ้าน ตู้เย็นในบ้านเรามันสามารถจะสั่งของกินเอาไว้ให้เราได้เอง  และเครื่องชงกาแฟมันก็ชงกาแฟไว้คอยท่าเราตอนกลับบ้าน   ระบบแอนดรอยด์@โฮมที่ว่า มันจะเชื่อมต่อกับเครื่องใช้ไฟฟ้าทั้งหลายแหล่ในบ้าน


googlefuture04 10 проектов будущего от Google
4. Space elevator
According to published in the journal «Time» information Google X team in 2011, the year included the idea of ​​a "space elevator" in the so-called list of "What if ...". I must say, the very concept of this method of delivery to the orbit of people and goods put forward by K. Tsiolkovsky in 1895, the year. 
Do not wait for Google's early implementation of this idea - the development of "lift into orbit," presents many technical challenges, and all the more likely to say that to implement this idea in life is impossible. However, it's probably Google thus "cover their tracks" to save the process of developing a secret.

ลิฟต์อวกาศ
  
เป็นแนวคิดที่จะส่งอะไรต่อมิอะไรไปไว้ในอวกาศ (the very concept of this method of delivery to the orbit of people and goods) ซึ่งถ้าจะว่าไป ก็คงเป็นข้อมูลข่าวสารนั่นแหละ เพราะเมื่อมันอยู่ในอวกาศได้ โอกาสที่มนุษย์ธรรมดาจะไปล้วง ไปเจาะ ไปแฮ็กข้อมูล มันก็คงจะยากขึ้นอ่ะนะ

  
googlefuture05 10 проектов будущего от Google
5. Watch a smartphone based on Android
Recently, it was reported that Google is preparing a direct competitor iWatch from Apple - a watch, combined with the smartphone: of course, watches SmartWatch smartphone from Google will use the operating system Android. 
This latest «must have»-new to the gadget lovers will be available early next year.

นาฬิกาอัจฉริยะ
  
SmartWatch  ที่รวมเอา smartphone กับนาฬิกา มาไว้ด้วยกัน  แล้วใช้ระบบปฏิบัติการ Android  ก็คือคู่แข่งของ iWatch จากค่าย Apple นั่นแหละ  

  
googlefuture06 10 проектов будущего от Google
6. Google will take care of your health
The Internet giant has a stake in the company Adimab, engaged in the development of diagnostics and treatment of various diseases, which would bring a variety of technologies and methods to combat diseases. The revolutionary idea is the invention of miniature sensors involved in the search and optimization of antibodies produced by the body - to start treatment only need to swallow such a sensor. 
Another development in the field of Google Health is a subsidiary of iPierian, creating the technology of "cellular reprogramming» (cellular reprogramming), which will fight the disease by modifying cells.
 Google เพื่อสุขภาพ   กูเกิลเข้าไปถือหุ้นในบริษัท Adimab  ที่ทำธุรกิจเกี่ยวกับการพัฒนาและวิจัยเกี่ยวกับการตรวจและรักษาโรคต่างๆ  แนวคิดก็คือ การประดิษฐ์ miniature sensors (ตัวตรวจจับขนาดจิ๋ว) ที่จะตรวจหาและปรับสารแอนติบอดีในร่างกายคน  เพื่อเริ่มการรักษา เพียงแค่กลืนตัวเซนเซอร์ที่ว่านี้เข้าไปแค่นั้น (to start treatment only need to swallow such a sensor)  นอกจากนี้กูเกิลยังจะพัฒนา Cellular reprogramming  (การโปรแกรมใหม่ให้เซล)  ซึ่งจะช่วยต่อต้านโรคร้ายได้ ด้วยการปรับแต่งเซลใหม่

   
googlefuture07 10 проектов будущего от Google
7. Internet airships cover the entire planet wireless
Google's ambitions as a provider of Internet reached all-time highs - the company is developing airships that will provide wireless connectivity the entire planet, including remote regions in Africa and other parts of the Earth. 
If the project is realized, the "world wide web" will get about another 1 billion people - mostly residents of the "third world."
 
ยานอินเทอร์เน็ต
   เพื่อจะทำการส่งสัญญาณอินเทอร์เน็ตแบบไร้สายไปให้โลกทั้งใบ  ไม่ว่าจะอยู่ส่วนไหนในโลก  อาทิ ดินแดนที่ห่างไกลในทวีปแอฟริกา  ก็สามารถเข้าถึงอินเทอร์เน็ตได้


googlefuture08 10 проектов будущего от Google
8. Game console based on Android
The popularity of the Android platform is growing all over the world, and Google is seeking to use its potential to the maximum. 
«Wall Street Journal» spoke about the development of the gaming console from Google, which is designed to be a "killer" similar technology "Yabloko» - Apple TV: game console from Google allows you to run any Android-games directly on your home television.

เกมคอนโซลในระบบแอนดรอยด์    
แพล็ตฟอร์มแอนดรอยด์มาแรงแซงเวอร์ไปทั่วโลกแล้ว  ยักษ์กูเกิลก็จะยิ่งดันให้มันแรงสุดๆ ไปเลย ด้วยการสร้างเกมคอนโซลที่สามารถรันได้จากสมาร์ตทีวี (ตอนนี้ประเทศไทยยังไม่มีอ่ะนะ ทีวีอัจฉริยะแบบที่ว่า) 

  
googlefuture09 10 проектов будущего от Google
9. The way Google determines the development of smart phones Motorola
Buy Google of Motorola Mobility (transaction was $ 12.5 billion) to become the owner of the first allowed 24.5 thousand patents and designs. 
Under the wing of the Internet giant will release a smartphone Motorola Moto X based on Android, which has all the modern features and characteristics, as well as, of course, a number of trendy "chips", which has no rivals - release date already quite close.
 Moto X สมาร์ตโฟน   กูเกิลไปจับมือกับค่าย Motorola สร้างสมาร์ตโฟน Moto X ที่รันบนระบบแอนดรอยด์  โดยกะว่า จะมีศักยภาพไร้เทียมทานกว่าใครใคร
  
googlefuture10 10 проектов будущего от Google
10. Eco-friendly sources of energy
The company Makani Power - developer of advanced technologies in the use of wind and solar energy: Google previously invested in the company a lot of money, and recently acquired in its entirety and included in the project, which deals with Google X. 
The best-known development Makani Power - wind turbines, hovering at an altitude of almost 300 m to 650 m-minute and allow to generate electricity out of thin air.

 
แหล่งกำเนิดพลังงานที่เป็นมิตรกับสิ่งแวดล้อม   ใช้เทคโนโลยีก้าวหน้าจากพลังงานลม และพลังงานแสงอาทิตย์  กูเกิลกับพันธมิตรลงทุนไปหลายตังค์ในการพัฒนา  

Folder and Printer Sharing การแชร์โฟลเดอร์/เครื่องพิมพ์

The Atmosphere of My 2003 Computer Class at 4th Floor of Building1.
They were energetic and very nice schoolkids I have ever experienced.

บรรยากาศห้องเรียนคอมพิวเตอร์  2546 สมัยยังอยู่ชั้น 4  อาคาร 1 
พวกเขาเป็นเด็กนักเรียนที่ขยันขันแข็ง ตั้งใจเรียน และเป็นเด็กดีมากที่สุดรุ่นหนึ่งเท่าที่ครูเคยเจอ
All of us use Windows7 as the operating software, and our computers are connected together within the workgroup of the LAN (local area network). So we should gain the benefit of its sharing capability. Here we go!
ตอนนี้พวกเราล้วนแล้วแต่ใช้ Windows7 เป็นซอฟต์แวร์ระบบปฏิบัติการ (ในห้องเรียน และที่บ้านด้วย)  และเครื่องของพวกเราก็เชื่อมต่อกันเป็นเวิร์กกรุ๊ปในระบบแลน  ดังนั้นเราก็น่าจะใช้ความสามารถในการแชร์ทรัพยากรระหว่างกันได้  ลองดูกัน

1. FOLDER SHARING
        การแชร์โฟลเดอร์

Be sure we have to specify what folder that we want to share?  
ต้องระบุโฟลเดอร์ที่ต้องการแชร์


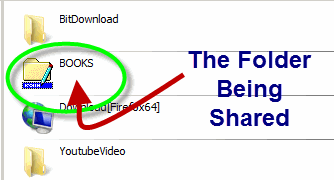
"BOOKS" is the folder of us to be shared.
ฟลเดอร์ "BOOKS" คือโฟลเดอร์ที่เราอยากแชร์

 Make a right clicking with the folder, the dialogue box appears. Select the "Sharing" tab and the "Advanced Sharing" button
คลิกขวาที่โฟลเดอร์  กรอบโต้ตอบจะปรากฏขึ้น  เราก็เลือกแท็บ 
"Sharing" และปุ่ม 
"Advanced Sharing"


Now the folder has never been shared yet (Not Shared)
ตอนนี้โฟลเดอร์นี้มีสถานภาพไม่ได้ถูกแชร์ไว้

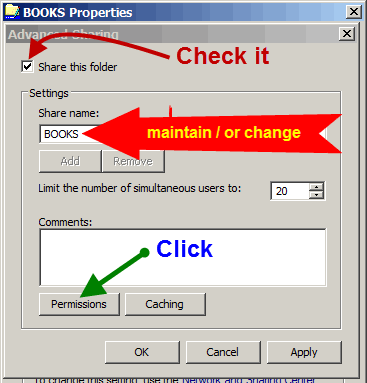
 Properties window of the folder appears and we should select to share it with others. Now we can see the maximum number of users to simultaneously enter to the folder is 20. Then we can click on the "Permission" button.
จะปรากฏหน้าต่างพรอพเพอร์ตีส์ (คุณสมบัติ) ของโฟลเดอร์นี้ขึ้นมา  และเราก็ต้องเลือกว่าจะแชร์กัน  และจะเห็นว่า เพื่อนๆ จะเชื่อมต่อเข้ามาใช้โฟลเดอร์ของเราพร้อมกันได้เต็มที่ 20 เครื่อง แค่นั้น  ต่อมาก็เลือกคลิกปุ่ม "Permission"

Tick the check-box, and we can change the share name or ignore it.
ติ๊กเลือกว่าจะแชร์  จะเปลี่ยน/หรือไม่เปลี่ยนชื่อที่จะแชร์ก็ได้

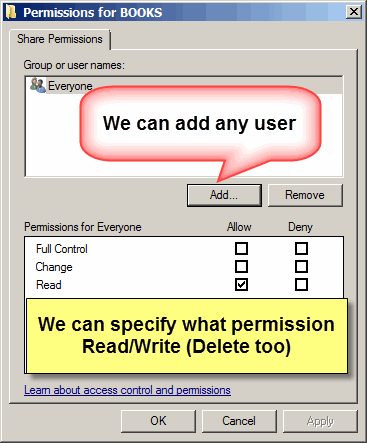
After clicking on the permission button, the Permissions window shows up, you can add any user e.g. "student" and you can change the permission type of the user.
หลังจากคลิกปุ่ม permission  จะมีหน้าต่างโผล่มาให้เราปรับเปลี่ยนตามความต้องการ

We can add user/ specify his permission level.
เราสามารถเพิ่มยูสเซอร์ / ระบุระดับการอนุญาตใช้งานโฟลเดอร์ของเราแก่เขา

Finally click on the "Apply" button, the folder now has been shared. 
เมื่อเราคลิกปุ่ม "Apply" โฟลเดอร์ของเราก็ได้รับการแบ่งปันให้ใช้ร่วมกันได้ในเครือข่ายแล้ว

Well, our folder has been shared.
Folder ของเราได้รับการแชร์กันใช้เรียบร้อยแล้ว

Sample Special
ตัวอย่าง


This is from my computer (Its hostname is "ALPHA00".), when I click on the "Network" (at the left pane of Windows7 " computer explorer" ),  some computer hostnames appears.  Yes, I want to randomly select any hostname. If the target of mine is "KACHATUCH", well, I would make a double-click on it.
นี่เป็นคอมพิวเตอร์ของครูที่ห้องพักครู (โฮสต์เนมว่า ALPHA00)  เมื่อครูคลิกเลือก Network (อยู่ตรงแถบซ้ายของหน้าต่าง Computer explorer ของ Windows7 ก็จะปรากฏโฮสต์เนมต่างๆ ในเครือข่าย  แน่นอนว่า ครูก็คงต้องสุ่มเลือกเข้าไปใช้เครื่องใดสักเครื่อง  ที่ครูเล็งไว้ก็คือเครื่องที่มีโฮสต์เนมว่า Kachatuch

My Target Hostname is "KACHATUCH"
เครื่องที่ครูเล็งไว้คือ โฮสต์เนมที่ชื่อว่า Kachatuch

The shared folders of the hostname will be appeared. Then we can do a random selection and we can find any other subfolders that we can select to use.
ตอนนี้ก็จะเห็นโฟลเดอร์ที่โฮสต์เนม Kachatuch  เราก็คงต้องสุ่มเลือกโฟลเดอร์  แล้วเราก็จะเห็นโฟลเดอร์ย่อยๆ ที่เราสามารถจะเลือกเข้าไปใช้ได้ 

The Shared Folders of "Kachatuch" appears, any folder could be selected.
  If any shared folder had been selected its subfolders would be revealed. 

แชร์โฟลเดอร์ของโฮสต์เนม "Kachatuch" ก็จะปรากฏขึ้นมาให้เห็น เราสามารถเลือกโฟลเดอร์ไดก็ได้
ถ้าแชร์โฟลเดอร์ใดถูกเลือกเข้าใช้ โฟลเดอร์ย่อยๆ ก็จะได้รับการเปิดตัวออกมาให้เห็นฝเลือกใช้ได้


 2. PRINTER SHARING
        การแชร์พรินเตอร์


 Click the "Start button" of Windows7 desktop, the pop-up menu appears, then select "Devices and Printers", the target printer of us will be appeared.
จากปุ่ม Start ของ Windows7 เราก็เลือก "Devices and Printers"  ก็จะเจอพรินเตอร์ที่เราอยากจะแชร์กันใช้

Select the printer

 Make a right click on the printer icon, the select menu will show up, then select "Printers properties" option.  Then we can operate sharing easily.
คลิกขวาที่รูปพรินเตอร์ จะมีป็อปอัพเมนูโผล่ขึ้นมา ให้เราเลือก "Printers properties" ต่อจากนี้ เราก็คงจะปฏิบัติการแชร์พรินเตอร์ได้ไม่ยากแล้ว...

Select : Printer Properties

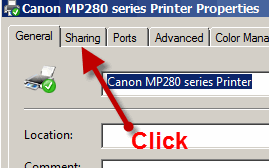
Click on the "Sharing tab", and we can rename the sharing printer.
เลือกแท็บ Sharing และสามารถเปลี่ยนชื่อพรินเตอร์ที่กำลังจะแชร์ได้ด้วย

Select the Sharing Tab
    
Select to share

Programming (การโปรแกรม) with Visual Basic 6.0

What is Visual Basic?
วิชวลเบสิกคืออะไร


Visual Basic is a tool that allows us to develop Windows (Graphic User Interface - GUI) applications.  The applications have a familiar appearance to the user.
วิชวลเบสิก เป็นเครื่องมือของเราในการสร้างแอ็ปปลิเคชัน (โปรแกรมประยุกต์) ที่ทำงานภายใต้ระบบปฏิบัติการ Windows ซึ่งแอ็ปปลิเคชันที่ได้จะมีรูปแบบการติดต่อกับผู้ใช้เป็นกราฟิก (GUI : Graphic User Interface)
 
 Visual Basic is event-driven, meaning code remains idle until it is called upon to respond to some event (e.g. mouse clicking, button pressing, menu selection, ...).  Nothing happens until an event is detected.  Once an event is detected, the code corresponding to that event (event procedure) is executed.  
 
วิชวลเบสิก จะใช้ Event (เหตุการณ์) เป็นตัวขับเคลื่อนคำสั่ง (event-driven)  หมายความว่า โค้ดของโปรแกรม จะยังไม่ทำอะไร (idle) จนกว่ามันจะถูกเรียกให้ตอบสนองต่อ event  (เช่น การคลิกเมาส์  การกดปุ่ม  การเลือกเมนู  ฯลฯ)  นั่นคือ จะไม่มีอะไรเกิดขึ้นจนกว่า event จะถูกตรวจพบ  เมื่อนั้นแหละ code ของโปรแกรมก็จะตอบสนองต่อ event นั้นๆ  ในลักษณะของโปรแกรมย่อยๆ หรือโมดุล (event procedure)
 

 How to program with Visual Basic?
จะโปรแกรมด้วยวิชวลเบสิกอย่างไร


Steps in Developing Application 
ขั้นตอนการพัฒนาแอ็ปปลิเคชัน

There are three primary steps involved in building a Visual Basic application:
มีขั้นตอนหลักๆ 3 ขั้นตอน ที่เกี่ยวข้องกับการสร้างแอ็ปปลิเคชันด้วยวิชวลเบสิก
1.    Draw the user interface  ออกแบบส่วนติดต่อกับผู้ใช้
2.    Assign properties to controls  กำหนดคุณสมบัติให้กับคอนโทรล
3.    Attach code to controls  ผูกติด code เข้ากับคอนโทรล


Stop Watch Application
โปรแกรมจับเวลา

            SOURCE  :   www.kidwares.com

1 At the "Start-up Menu" of our Windows Desktop, let's find where "Microsoft Visual Studio 6.0" is, and click on it. Then we can see some shortcuts to the applications of the software suite, and "Microsoft Visual Basic6.0" is one of them and it is also our "target software" right now, let's select it.
ณ  สตาร์ทอัพเมนู ที่หน้าเดสต์ท็อปของระบบวินโดวส์  นักเรียนลองหาเมนู Microsoft Visual Studio 6.0  และคลิกเมาส์เลือก เราจะเห็นช็อตคัตของแอปปลิเคชันต่างๆ ที่รวมกันอยู่ในซอฟต์แวร์ชุดนี้ รวมถึง Microsoft Visual Basic6.0 ซึ่งเป็นซอฟต์แวร์เป้าหมายที่เราจะใช้ในงานนี้แหละ  เราก็เลือกซะนะ

At the "Start-up Menu of Windows", Find where the "Microsoft Visual Basic 6.0" is.
ณ สตาร์ทอัพเมนูของระบบวินโวส์  ให้หาว่า Microsoft Visual Basic 6.0 อยู่ไหน


2 We now at the main screen of Visual Basic 6.0 with its "New Project" window. Let's click on the "New" tab and select "Standard EXE" icon.
 ตอนนี้เราก็มาอยู่ ณ หน้าจอหลักของ Visual Basic 6.0 ซึ่งมีหน้าต่าง New Project โชว์อยู่  ให้เราเลือกแท็บ New และสัญรูป Standard EXE 
Select the "Standard EXE" icon  ให้นักเรียนเลือกสัญรูป Standard EXE

3 Before we go on, let's consider the components of the toolbar of Visual Basic 6.0.  Properties window, Run and Save project are what we have to focus on now.
ก่อนอื่น ขอให้เราลองพิจารณาแถบเครื่องมือของ Visual Basic 6.0 กันก่อน  Properties window, Run, Save project เป็นอะไรที่เราจะต้องโฟกัสออนกันก่อนตอนนี้ 

Design View of Visual Basic 6.0   มุมมองในโหมดออกแบบของวิชวลเบสิก

4 Controls are the genius tools that can be attached by any codes that can control any events such as clicking mouse or pressing key. Now the "Command Button" and the "Label" are the controls that we are going to use.
คอนโทรล เป็นเครื่องมืออัจฉริยะ ที่สามารถจะนำเอาโค้ดคำสั่งมาผูกติด ทำให้สามารถควบคุมเหตุการณ์ได้ อาทิ  การคลิกเมาส์  หรือการกดแป้นพิมพ์  ตอนนี้คอนโทรลที่เรากำลังจะใช้งานก็คือ Command Button และ Label

Controls of Visual Basic 6.0   คอนโทรลต่างๆ ของวิชวลเบสิก 6.0

5 Visual Basic programming begins with a form which has been named "Form1" by default. Visual Basic form simulates itself as platform which can receive many kinds of objects that created by the controls. Any object has its properties that has been shown in the properties window.
การโปรแกรมด้วยภาษาวิชวลเบสิกนี้ จะเเริ่มจาก Form ซึ่งโปรแกรมจะกำหนดชื่อให้ก่อนเลยว่า Form1 (เราสามารถเปลี่ยนชื่อได้)  ฟอร์มของวิชวลเบสิกจะจำลองตัวมันเองเป็นเสมือนแพล็ตฟอร์ม ที่สามารถจะรองรับวัตถุหรืออ็อบเจ็กต์ที่สร้างจากคอนโทรล (ด้านซ้าย)  และวัตถุนั้นมันจะมีคุณสมบัติหรือพร็อพเพอร์ตีส์ของตัวมันเอง โดยจะแสดงให้เราเห็นในหน้าต่างพร็อพเพอร์ตีส์ (ด้านขวา) 

Form and Controls are variety kinds of object of Visual Basic that have their own properties. 
Form และ Controls เป็นอ็อบเจ็กต์(วัตถุ) ที่หลากหลายของ Visual Basic ที่มี properties ของตนเอง
6 Here we go on creating a design job like the following picture.  
    -  Using the "Command Button" control to draw the three sequence command buttons, Command1,Command2 and Command3. 
   -  Using the "Label" control to draw the six sequence labels, Label1, 
Label2, Label3, Label4, Label5 and Label6 
ให้นักเรียนลงมือสร้างงานออกแบบ ตามรูปด้านล่างนี้เลยนะ
   -  โดยการใช้คอนโทรล Command Button วาดปุ่มคำสั่งขึ้นมาสามปุ่มตามลำดับ
   -  โดยการใช้คอนโทรล Label  วาดอ็อบเจ็กต์ต่อเนื่องกัน รวม 6 เลเบิล

Form1 would have three command buttons and six labels now.
Form 1 ที่เราออกแบบนี้ก็จะมีปุ่มคำสั่ง (command button) 3 ปุ่ม  และมีฉลาก (label) รวม 6 ฉลาก  
7 Click on "Form1", we can see its properties, rename it with "frmStopWatch" (frm is a pefix which comes from "form"). And change its caption to "Stop Watch Application".
คลิกที่อ็อบเจ็กต์ Form1 เราจะเห็น properties ของมันอยู่ทางด้านขวา  ให้เราปรับเปลี่ยนชื่อ (name) ของมันใหม่เป็น "frmStopWatch" (frm เป็นคำนำหน้าชื่อ มาจาก form นั่นเอง)  และปรับเปลี่ยน Caption (คำอธิบายอ็อบเจ็กต์) ให้เป็น "Stop Watch Application"

Form1 Properties Configurations  การตั้งค่าคุณสมบัติของอ็อบเจ็กต์ Form1


8 Click on "Command1", yes we are about to specify the properties of this object. Rename it with "cmdStart" (cmd is a prefix which comes from "command button") and also refill its caption with "&Start Timing" (& is a prefix of the key letter that a user can press on this key together with the "alt" key instead of click on this command button). 
คลิกปุ่ม Command1 เพื่อเปลี่ยนคุณสมบัติ  โดยให้ชื่อใหม่ว่า cmdStart (cmd เป็นคำนำหน้า มาจาก Command Button)  และเปลี่ยน Caption ให้เป็น "&Start Timing" (& นำหน้าตัวอักษรสำคัญที่จะบอกผู้ใช้ให้รู้ว่า เขาสามารถกดคีย์นี้ร่วมกับคีย์"alt"ที่คีย์บอร์ด เพื่อใช้งาน command button แทนการคลิกเมาส์ได้). 


Change the properties of the command button :  name and caption
ให้นักเรียนเปลี่ยนชื่อ และแค็ปชันของปุ่มคำสั่ง

9 Do it the same way as the previous step. ทำเหมือนขั้นตอนที่แล้ว 
Change the properties of the command button :  name and caption


10 Do it the same way as the previous step.ทำเหมือนขั้นตอนที่แล้ว

Change the properties of the command button :  name and caption


11  Change only the captions of Label1, Label2 and Label3 according to the following picture. ให้เปลี่ยนเฉพาะ Caption ของทั้งสาม Labels เท่านั้น  ไม่ต้องเปลี่ยนชื่อ (เนื่องจากเป็นแค่ป้ายกำกับเท่านั้น ไม่ได้เกี่ยวข้องกับการกำหนดโค้ดโปรแกรม)

Change the properties of the three labels :   captions  เปลี่ยนแค่แค็ปชันของสามเลเบิลแรก

12  Change the properties of the other last three labels, "Label4", "Label5" and "Label6" by renaming them to "lblStart", "lblEnd" and "lblElapsed" and erase their captions until they are blank.
เปลี่ยน properties ของ Label4, Label5, Label6 โดยเปลี่ยนชื่อเป็น lblStart, lblEnd, lblElapsed  และลบ captions ของทั้งสามเลเบิลออกจนว่างเปล่าทั้งหมด

Change the properties of Label4, Label5 and Label6 according to the picture. 
เปลี่ยนชื่อของสามเลเบิลท้าย  และเคลียร์แค็ปชันให้ว่าง (blank)
13  Now we have just already designed and configured all of related objects, the next step of us is coding our program. Let's click on the menu-bar at the "View" command tab, then select the "Code" sub-command, the view-code window will show up. Yes, we are going to enter our source codes of our application here. 
มาถึงตอนนี้ เราก็ได้ทำการออกแบบ และกำหนดคุณสมบัติต่างๆ ให้กับอ็อบเจ็กต์ต่างๆ ที่เกี่ยวข้องไปเรียบร้อยแล้ว  ขั้นตอนต่อไปของเราก็คือ การใส่โค้ดให้กับโปรแกรมของเรา  ให้นักเรียนคลิกไปที่แท็บคำสั่ง View ของแถบเมนู  จากนั้นให้เลือกคำสั่งย่อย Code  หน้าต่างโค้ดก็จะปรากฏขึ้น  ใช่เลย เราจะป้อนซอร์สโค้ดโปรแกรมของเราตรงนี้แหละ

Click on the "View" command at the menu bar, then select "Code" subcommand

14  The first set of source codes is about the declarations. There will be the "(General)" at the left-top of the view-code window and the "(Declarations)" at the right-top. We have to type four lines of our following source codes.
ซอร์สโค้ดกลุ่มแรก เป็นโค้ดที่เกี่ยวข้องกับการประกาศตัวแปร  นักเรียนจะเห็นว่ามี (General) อยู่ที่หัวข้อด้านซ้าย  และ(Declarations) อยู่ที่หัวข้อด้านขวา

        1st Line is about the General Declaration  เป็นคำประกาศทั่วไป
        2nd Line is the Declaration of variable "StartTime"  ประกาศตัวแปรเพื่อรับค่าเวลาเริ่มต้น
        3rd Line is 
the Declaration of variable "EndTime" ประกาศตัวแปรเพื่อรับค่าเวลาที่หยุด
        4th Line is the Declaration of variable "ElapsedTime"
 ประกาศตัวแปรเพื่อรับค่าเวลาที่ใช้ไป
15  This step is about attaching our source code to a control object. The "cmdStart" is a command button we are going to attach the source code. Let's double click on this command button, yes, this action could bring us to a module or subprogram that could be driven by an event, _click ( ), that means this subprogram could work when this command button was clicked on. 
ขั้นตอนนี้ จะเป็นการผูกซอร์สโค้ดโปรแกรมของเราไว้กับปุ่มคำสั่ง cmdStart  ให้นักเรียนดับเบิลคลิกที่ปุ่มคำสั่งนี้ (เมื่อเราอยู่ในมุมมอง Object)  จากนั้นจะพาเราเข้าสู่ห้วงของโมดุลหรือโปรแกรมย่อย  ซึ่งโปรแกรมย่อยหรือโมดลที่ว่านี้ จะถูกขับเคลื่อนโดยเหตุการณ์ (event-driven)  ซึ่ง ณ ที่นี้ก็คือ " _click ( )" การคลิกเมาส์ของผู้ใช้โปรแกรมนั่นเอง 
 What is about this source code?  It begins with assigning the recent time value (Now) to the variable "StartTime".  Then the method "Caption" stipulates that the label "lblStart" can show up data from the variable "startTime" with the "hh:mm:ss:" format.
ซอร์สโค้ดนี้มันคืออะไรหรือ?  โค้ดจะเริ่มจากการกำหนดให้ตัวแปร StartTime เอาค่า Now คือเวลาปัจจุบันไปเก็บไว้  ต่อจากนั้นโค้ดก็จะมีวิธีการ (Method) ที่ชื่อว่า Caption  เป็นตัวกำหนดรูปแบบการแสดงค่าของเวลา โดยเอาค่าที่เก็บไว้ในตัวแปร StartTime นั้นมาแสดงผลเวลาในเลเบิล lblStart
  
Attach code to the command button "cmdStart"
ผูกโค้ดเข้ากับปุ่มคำสั่ง "cmdStart"

16  This step is similar to the previous but it turns to the "cmdEnd" command button. But it creates the expression which assigns the variable "ElapsedTime" with the difference of the variable "EndTine" and the variable "StartTine".
ในขั้นตอนนี้ ก็คล้ายกับขั้นตอนที่ผ่านมา  แต่จะมีการสร้างนิพจน์คำนวณค่าส่วนต่างของเวลา ระหว่่างตัวแปร EndTime และตัวแปร StartTime และนำไปเก็บไว้ในตัวแปร ElapsedTime
  
Attach code to the command button "cmdEnd"
ผูกโค้ดเข้ากับปุ่มคำสั่ง "cmdEnd"

17  This is the end of application with the only amazing word "End"
Attach code to the command button "cmdExit"
ผูกโค้ดเข้ากับปุ่มคำสั่ง "cmdExit"


18  Congratulation to our tough project!. This is the output of our input and process. Yes, it is the "Stop Watch Application" of us.  
ขอแสดงความยินดีกับโครงงานสุดหินนะนักเรียน  นี่คือผลที่ได้ จากการสร้างและป้อน  ประมวลผล  จนได้แอ็ปปลิเคชันนาฬิกาจับเวลา หน้าตาแบบนี้แหละน้า 

Our Graphic User Interface Application :  "Stop Watch"
แอ็ปปลิเคชันของเราที่มีรูปแบบการติดต่อกับผู้ใช้เป็นกราฟิก (GUI)
19  We have to make our project to an independent application.  Click on the "File" command at the menubar then select the "Make..to..EXE" subcommand.   
เราต้องทำให้โปรเจ็กต์ (โครงงาน) ของเราที่รันได้แล้วนี้ ให้กลายเป็นแอ็ปปลิเคชันอิสระที่สามารถรันได้เอง (โดยที่ไม่ต้องอาศัย Visual Basic)  ทำได้โดยการคลิกคำสั่ง File  ณ แถบเมนูคำสั่ง  แล้วเลือกคำสั่งย่อย Make..to..EXE  เท่านี้ก็เสร็จเรียบร้อย